Herman
Intro
Herman is a "contouring" reverb designed to work with the AU, AAX and VST3 plugin standards, on Windows & Mac OS. This manual serves as a full explanation into every parameter and system featured within the scope of the plugin. It will be updated along with the program itself. Assume that this manual is representing the latest version of the plugin available on our website.
Be sure to check out the Common Features page to learn about capabilities that every Lese plugin has.
Basics
Signal Flow
Sound that goes into Herman passes through the following stages, in this order:
- Illusion, which replays fragments of the recent input.
- Drive, which saturates the input.
- Tape, which adds tape wear to the input.
- The reverb itself, with the four contour slots running inside its loop.
- Bloom, which adds a pitched layer on top of the reverb's output.
- The Mix control, which blends the result with the dry signal.
Everything apart from the mix only affects the wet (reverb) signal; the dry signal is always left untouched.
Contour Slots
The reverb is made up of 16 delay lines, and they are split into four groups of four (normally, see the Complexity control). Each group is a contour slot, which runs one contour on its lines. This means that each contour only reshapes a "quarter" of the reverb at a time (they feed into eachother though), and the four slots blend together into one tail; you can stack four different contours, or use the same type in more than one slot.
Contours are designed so that they don't change how long the tail lasts. A contour that can reduce signal magnitude (like a filter would) has makeup gain applied afterwards, so the Decay control keeps setting the length of the tail, whatever the contours are doing. The exception is Gate, where the loss of level is the whole point :).
See Contours for how to set them up, and for every contour type.
Sidechain Modulation
The Size, Decay and Diffusion controls can each be modulated by a sidechain. Right-clicking one of these knobs, or clicking the "chain" icon in its top-right corner, opens up the Sidechain Modulation menu. This allows either an external sidechain input, or the sound already passing through to be used as basis for modulating the value of the given parameter. You can also change the attack & decay times to use for this modulation. The same system is used in Fletcher, as well as other plugins.
Key-Tracking
Two parts of Herman can follow incoming MIDI notes: the Bloom process, and the Resonate contour. With key tracking turned on, they take their pitch from the last MIDI note played instead of from their own controls, and hold onto it once the keys are released.
While key tracking is on, a small light next to the key tracking button flashes when MIDI notes come in. Clicking the light lets you pick which MIDI channel to listen to (or all of them). The channel is shared by everything that does key tracking.
Top Controls
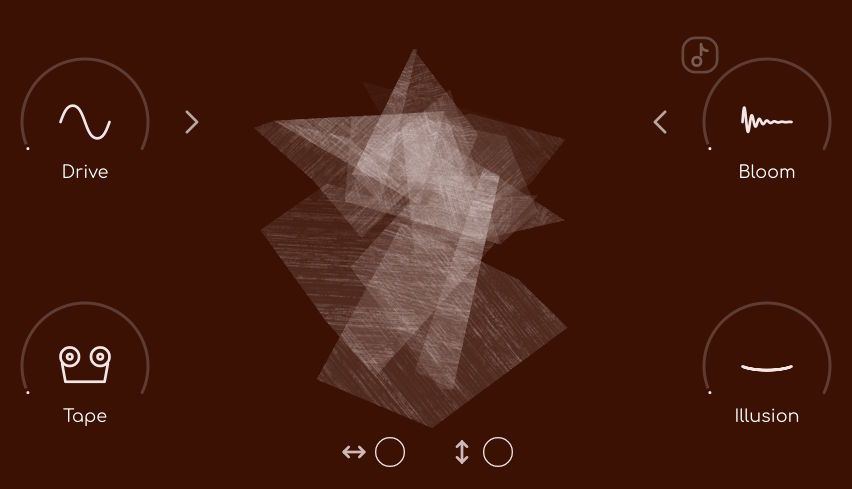
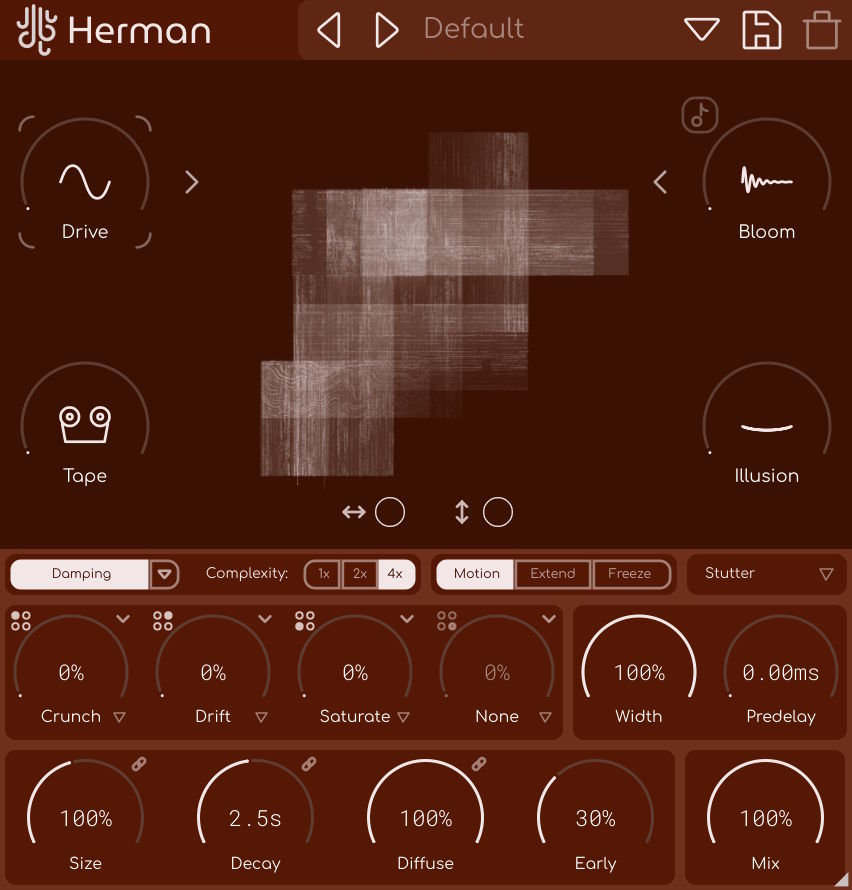
These controls are on the top half of the interface, in two columns on either side of the visualizer. The left column holds the Drive over the Tape, and the right column holds the Bloom over the Illusion. The Drive and Bloom each have an arrow button which pops out a panel with the rest of their settings; clicking anywhere outside of the panel closes it.
Visualizer
The hatching in the middle of the interface follows your input: louder input makes it change faster, and sharp transients (like drums) bring in new blocks straight away. The visualizer's layout is decided by the Illusion Mode, and it changes when Extend or Freeze are turned on. Moving your mouse over the visualizer tilts it slightly.
Modulation
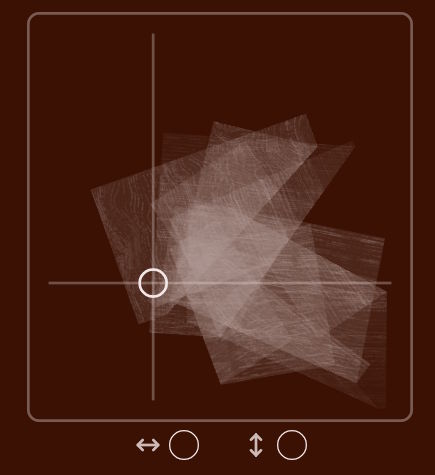
Additionally, moving your mouse over the visualizer shows Herman's XY modulation pad. This XY pad lets you add modulation to any parameter that's available in Herman; just drag the two mod buttons below the XY pad onto any knob, and the modulation is set.
Drive
The "Drive" knob saturates the sound on its way into the reverb, from 0 to 36 dB. The drive is focused on the low end: everything below the Drive Frequency is pushed into the saturator the hardest, so the lows are what generate the harmonics. Herman keeps the level of the driven sound the same as what went in, so turning the drive up adds harmonics without making the sound louder. This is referred to as "coloration" in our designs, and is used in other plugins as well such as Teuri.
At 0 dB the drive is fully transparent, regardless of input level.
Drive Frequency
The arrow next to the Drive knob opens up the Drive Frequency control (30 Hz - 8 kHz). This sets the frequency that the drive boosts from.
Tape
The "Tape" knob adds the sound of worn tape to the reverb's input. One knob turns up three effects together:
- Drift: wow and flutter, so the pitch wanders sharp and flat.
- Crinkles: short moments where the tape has been creased, and the sound jitters, wobbles and loses its highs.
- Dropouts: every few seconds the level dips briefly, along with the highs.
These all come in more often and harder as the tape amount is turned up.
Bloom
The "Bloom" knob controls an emulation of a lock-in amplifier (a piece of lab equipment that's used to pull a single frequency out of noise). Bloom runs on the reverb's output, where it "locks" onto the Bloom Frequency and its harmonics, and adds what it picks up on top of the reverb as a pitched tone. That tone follows the reverb's own spectrum and motion, so it swells and fades along with the tail.
At 0% bloom adds nothing, and at 100% the bloom's layer is generally as loud as the reverb.
Bloom Settings
The arrow next to the Bloom knob opens up the bloom's other settings:
- Bloom Frequency: the pitch that the bloom locks onto, from 20 Hz to 2 kHz.
- Bloom Time: how long the bloom takes to lock on, from 1 ms to 500 ms. Short times give a wide, buzzy tone (it moves around in frequency pretty fast, because the "lock on" period is shorter), and long times give a narrow, slowly moving drone (vice versa).
Bloom Key Tracking
The button in the top-left of the Bloom knob turns on key tracking (see Key Tracking), so the bloom follows the last MIDI note played instead of the Bloom Frequency.
Illusion
The "Illusion" knob crossfades the reverb's input into random fragments of the last few seconds of audio, replayed in a pattern decided by the Illusion Mode. This feature is adapted from Hikari's Illusion control, with some extra features added on top;
Illusion Mode
The Illusion Mode menu is on the right end of the strip in the bottom half of the interface, under the Illusion knob. Changing the mode crossfades smoothly from the old mode to the new one.
- Reverse: two overlapping fragments, played backwards from random points. This is the same as Hikari's illusion.
- Scatter: a cloud of short fragments from random points, playing forwards or backwards, each with its own level and stereo position. Several play at once.
- Stutter: grabs the latest bit of audio and repeats it a few times back to back (sometimes backwards), then grabs the next.
- Endless: several fragments that never stop; each plays backwards through the whole history, and wraps back around to the newest audio when it reaches the oldest, looping forever.
Reverb Controls
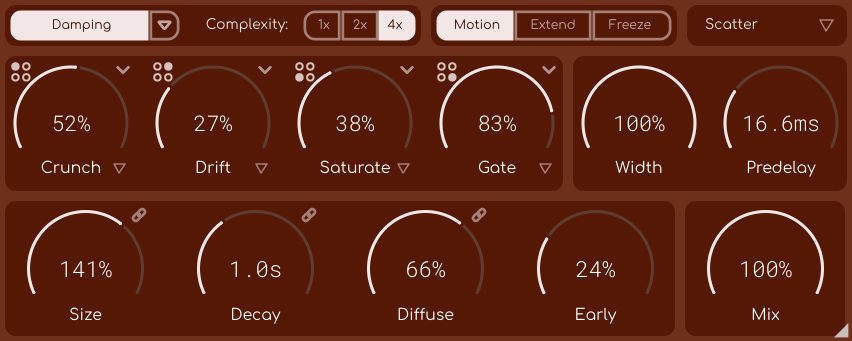
These controls are listed from top to bottom, and left to right, for clarity's sake.
Damping
The "Damping" toggle turns the reverb's damping on and off, and the arrow next to it opens up the damping panel. Damping shapes how quickly the lows and highs of the tail die away. The panel has two shelves, a low one and a high one, which can be dragged to change their frequency (25 Hz - 16 kHz) and gain (-6 dB to +3 dB).
The gain of each shelf is the change on every pass around the reverb: cutting a shelf makes that part of the spectrum decay faster, and boosting it makes it decay slower. Boosts are limited inside the reverb at long decay times, so that the tail stays stable. With damping turned off, both shelves are flat.
Complexity
The "Complexity" switch sets how many delay lines the reverb runs. 1x runs 4 lines, which is sparse and coloured, 2x runs 8, and 4x runs all 16, which is the full, dense network. Changing it fades the tail out and restarts it.
All four contour slots keep running at every complexity setting; with fewer lines each slot just has fewer of them to work on (one each at 1x, two each at 2x and four each at 4x).
Motion
The "Motion" toggle turns on and off the reverb's own gentle internal movement, which keeps the tail from ringing metallic. Turn it off for a still, static tail. If you want more movement than Motion gives, try the Mod contour.
Extend
The "Extend" toggle makes every delay line in the reverb ten times longer, so that you can hear the individual passes around the reverb (and the contours building up on each one). The Decay control still sets how long the tail lasts.
Freeze
The "Freeze" toggle holds the reverb's tail forever, and stops new sound from going into it. Damping is faded out while the reverb is frozen, so the held tail doesn't lose its lows or highs over time.
The contours keep running while the reverb is frozen, so a frozen tail keeps on being reshaped; for instance, a frozen tail with Drift will keep wobbling, and one with Phaser will keep sweeping.
Width
The "Width" control sets how wide the reverb is, where 0% is mono and 100% is full stereo.
Predelay
The "Predelay" control sets how long it takes before sound reaches the reverb, from 0 to 500 ms.
Size
The "Size" control scales the length of the reverb's delay lines, from 25% (a small room) to 200% (a large hall). Size can be modulated with a sidechain (see Sidechain Modulation).
Decay
The "Decay" control sets how long the tail lasts, from 200 ms to 30 seconds. Decay can be modulated with a sidechain.
Diffusion
The "Diffuse" control sets how much the sound is smeared before it enters the reverb. Lower values keep more of the sound's original attack in the tail. Diffusion can be modulated with a sidechain.
Early
The "Early" control sets the level of the early reflections, which follow the Size control.
Mix
Mix is the dry / wet control, which is standard in most audio plugins. Turning it down puts more of the original sound through, and turning it up puts more of the processed sound through. The mix stays where it is when you change presets.
Contours
Using Contours
Each of the four contour knobs sets how much its contour "reshapes" the tail (at 0% a contour does nothing at all, so you can leave a slot's type set and only bring the contour in when you want it via external automation / modulation). The type of contour that a slot is using is picked from the dropdown menu that shows up in place of the knob's name. Changing the type smoothly fades the old contour out before the new one fades in, so it can be done while audio is playing.
The default preset has Crunch, Drift and Saturate in the first three slots, and nothing in the last one, all turned down to 0%.
Some contour types are not available in demo mode, and will be greyed out / non-selectable in those cases. The types available in demo mode are Crunch, Drift, Saturate and Mod. Factory presets that use any of the other types are hidden in demo mode as well.
Advanced Mode
The arrow in the corner of each contour knob opens up that contour's settings, in a panel which covers the bottom row of knobs (only one contour's settings can be open at a time). Clicking the arrow again, or clicking anywhere outside of the panel, closes it.
The settings only do something while advanced mode is on, which is the toggle with the sliders icon in the top-right of the panel. With advanced mode off the contour runs with its default settings, and the knobs are dimmed. While advanced mode is on, the contour's arrow turns yellow. Every contour type has its own settings (between one and four of them), which are listed under each type below.
Most of these settings change what the contour knob sweeps over, rather than the contour's amount; for instance, the Drift's Depth setting changes how deep the drift goes when its knob is at 100%.
Contour Types
None
The slot does nothing, and its lines are left as clean reverb.
Crunch
A pretty standard bit-crusher. Turning the knob up lowers the bit depth and lengthens the sample & hold together, so the tail gets grainier on every pass. The bit depth follows the level of the tail, so quieter parts of the tail are crushed as much as louder parts.
- Bits: the bit depth at 100%, from 1 - 16 bits.
- Hold: the longest sample & hold at 100%, from 1x - 64x.
Drift
A worn tape loop emulation. Each of the slot's lines drifts in pitch on its own, and the whole slot drops out briefly every now and then. Turning the knob up makes the drift deeper and faster, and the dropouts more frequent. Since the drift lengthens the slot's lines a little, a slot running Drift can last slightly longer than the decay setting.
- Depth: the deepest the drift goes, from 0.5 - 24 ms.
- Rate: the fastest the drift goes, from 0.1 - 8 Hz. At lower settings of the contour knob, the drift runs slower than this.
- Drop Max: the longest amount of time that an individual dropout can last, from 20 - 400 ms (80 ms).
- Drops: how many dropouts happen per second, from 0 - 12.
Resonate
A tuned resonator, which "pulls" the tail onto a major chord. Sound that matches the frequencies in the chord continues to ring, while sound outside of it dies away a little faster on every pass, so the tail settles onto the chord as it decays.
- Root: the root note of the chord, from F# - F (C).
- Q: how narrow the resonances are, from 5 - 100 (30). Higher values "ring" more and sound more pitched.
The resonator can also follow incoming MIDI notes for its root, with the key tracking button in the top-right of the Root knob (see Key Tracking). The Root knob is dimmed while key tracking is on.
Saturate
Basic saturation. The knob sets how hard the tail is driven. The saturation works on the absolute level of the tail, just like a normal saturator would, so loud tails saturate while quiet ones stay clean; this means that a decaying tail will get "cleaner" as it fades away (i.e. it won't get more and more distorted as it progresses, unless the input is really loud).
- Drive: the most drive at 100%, from 6 - 48 dB (36 dB).
Shimmer
A pitch shifter. On every pass part of the tail is shifted up an octave, so the tail keeps climbing in pitch until the high damping takes it away. Shimmer effects exist in other reverbs as well, but ours is capable of more with the extended settings:
- Interval: the interval that the tail is shifted by, from -12 to +24 semitones (+12, an octave up). The middle setting, 0, is labelled "detune", and gives a very slight detuning instead of a shift.
- Window: the length of the pitch shifter's window, from 20 - 150 ms (50 ms). Shorter windows tend to sound more grainy.
- Blend: how much of the tail is shifted on each cycle at 100%, from 10% - 100% (50%). Shifting the whole tail on every pass climbs very fast, and can sound harsh.
Reverse
A granular reverse effect. Each line has it's own internal audio buffer, and plays itself back in reversed fragments (grains). Each have a random length, starting from a random point further back, and it smears the tail into a swelling, backwards granular cloud (even more than it already would be).
- Min Grain: the shortest grain, from 40 - 1000 ms (150 ms).
- Max Grain: the longest grain, from 100 - 1500 ms (1000 ms).
- Scatter: how far back the grains can start, at 100%, from 0 - 250 ms (60 ms).
- Fade: how long each grain fades in and out over, from 5 - 200 ms (75 ms).
Formant
A slowly moving vowel filter, so the tail "talks". The filter glides through the vowels a, e, i, o & u, and each of the slot's lines is at a different point in the cycle, so that they don't say the same vowel at once.
- Rate: how fast the filter moves through the vowels, from 0.01 - 2 Hz (0.12 Hz, one cycle every ~8 or so seconds).
- Shift: moves every formant up or down, from -12 to +12 semitones (0). Shifting down sounds like a bigger voice, and shifting up a smaller one.
- Spread: how far apart the various lines are in the vowel cycle, from 0 - 0.5 (0.13).
Shift
A frequency shifter. Every frequency in the tail is moved up by the same amount on each pass, so the harmonics stop lining up; the tail turns bell-like and climbs like a barber pole. Small amounts of shift are also a good way to break up any metallic ringing in the tail.
- Shift: the most shift at 100%, from 1 - 500 Hz (30 Hz). The lower half of the contour knob covers the subtle range of just a few Hz.
Mod
Delay modulation (chorus) on the slot's lines. This is the same kind of effect as the Motion toggle, but more apparent, and with its own settings. Each line moves at a slightly different rate, so they never move together.
- Depth: the deepest the modulation goes at 100%, from 0.1 - 10 ms (2 ms).
- Rate: the speed of the modulation, from 0.05 - 5 Hz (0.6 Hz).
- Spread: how different the rates of the various lines are, from 0 - 0.9 (0.4).
Spring
Spring reverb style dispersion. Every pass is smeared into a falling chirp, with the highs arriving first and the lows trailing behind, which builds up into the drippy "boing" of a spring tank.
- Chirp: the strength of the chirp at 100%, from 0.2 - 0.92 (0.75).
- Stages: how many stages the dispersion has, from 8 - 64 (48). More stages make a longer chirp. Turning up the Stages value also increases the CPU usage.
Gate
A gated reverb, inside the loop. The gate follows the level of the slot, and closes once the tail has fallen a set amount below its peak; a new hit opens it again. The knob is the depth of the gate, where 100% mutes the slot's lines completely when the gate is set as closed.
A gate in one slot only cuts that slot's lines, which makes the tail drop and then decay faster. Using Gate in all four slots closes them together for the classic hard cut.
- Threshold: how far below its peak the tail has to fall before the gate closes, from 3 - 40 dB (12 dB).
- Hold: how long the tail has to stay below the threshold before the gate closes, from 0 - 1000 ms (150 ms).
- Release: how long the gate takes to close, from 5 - 500 ms (60 ms).
Phaser
A phaser. Notches sweep through the tail, and since they build up on every pass, the swirl gets deeper as the tail decays rather than staying at one depth.
- Rate: the speed of the sweep, from 0.02 - 5 Hz (0.25 Hz).
- Depth: how far the sweep goes either way, from 0 - 4 octaves (2 octaves).
- Stages: how many stages the phaser has, from 2 - 12 (6). Every two stages adds one notch.
- Centre: the center of the sweep, from 150 Hz - 4 kHz (700 Hz).
Ring
A ring modulator. Every frequency in the tail is split in two, one moved up and one moved down, which builds up into dense, bell-like clusters on every pass. At low frequencies (below ~20 Hz), it turns into a tremolo instead, and the tail pulses.
- Frequency: the modulator's frequency, from 1 Hz - 2 kHz (140 Hz).
- Spread: how different the frequencies of the slot's lines are, which widens the sound, from 0 - 0.5 (0.1).
- Drift: how much each line's frequency slowly wanders, from 0 - 1 (0.2).
Extra Information
Tips
Turning on Extend is the best way to hear what an individual contour is doing. Each pass around the reverb becomes long enough to hear on its own, so you can listen to the contour's effect building up, pass after pass.
Contours that change pitch (Shimmer, Shift and Ring) build up very quickly at long decay times, since the tail goes around the loop more times before it fades away. Try a lower contour amount with long decays, or use the Damping shelves to tame them.
Two slots running the same contour type behave independently, so for instance two Drift slots won't wobble in sync. Try using the same contour in all four slots for a stronger effect. If you noticed this in the contour descriptions, some of them have Spread parameters, in these cases, the difference between each line that the contours occupy becomes greater, or more similar.