Frahm
Intro
Frahm is a “gestural processor” designed to work with the AU, AAX, and VST3 plugin standards, on Windows & Mac OS. This manual serves as a full explanation into every parameter and system featured within the scope of the plugin. It will be updated along with the program itself.
The core idea of this program is that it uses multiple vector field algorithms in tandem with particles. The vector fields determine how the particles should move about in space, and a spatial sound processor takes the positions & other attributes of these particles and spatializes them.
Be sure to check out the Common Features page to learn about capabilities that every Lese plugin has.
Controls
These controls are listed from top to bottom, for clarity’s sake. Some of these controls may not make sense unless they are cross referenced with others, which we will attempt to deal with.
Particle Visualizer
The top “screen” visualizes the positions of the particles being processed:
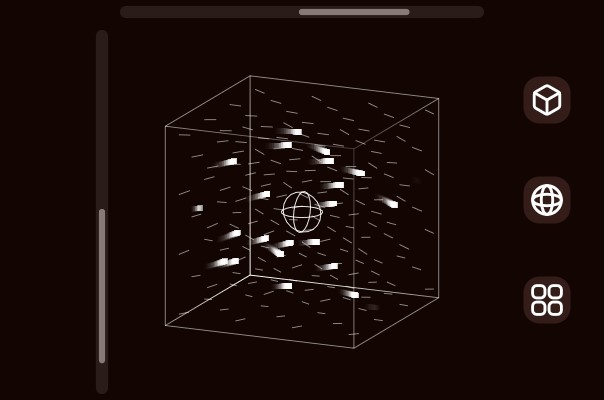
The vertical & horizontal sliders control the view angle at which the visualizer is being viewed at. They represent the elevation & azimuth angles, respectively. You can also drag the visualizer itself to change the perspective (limited to the azimuth & elevation angles available in the sliders).
The three buttons on the right side of the visualizer control which of the additional visual elements are shown in the visualizer.
The top “cube” button toggles if the simulation's boundaries are displayed. The “boundaries” of the simulation defines where the particles are allowed to exist. If particles exit the boundaries they will be culled and eventually respawned according to the vector field algorithm(s).
The middle “sphere” button toggles if the orientation sphere is displayed. The third “grid” button toggles if the force-field preview / visualizer is displayed (shows a bunch of lines that represent the direction that a particle would move towards if it was in that position).
Algorithms
The way that the particles move are handled with the next controls.
Modes
The first controls are the two selectors for the different algorithms that Frahm supports. This is a list of them, how they work, and the optional parameters that are supported.
Bulb
Keeps particles at a constant distance from the center. Particles come in in a small tube and will be forced outward, away from the center point depending on the “Distance” parameter. An additional parameter, Wrap, sets a factor for how tightly the particles will wrap back to their original positions once being forced away from the center point.
Cross
Makes particles move to and from along the center axis. Features a rate parameter, which controls the rate at which they move, a shift parameter, which sets how the rate will change over time, and a size, which sets the radius where the particles will originally spawn.
Flow
Similar to the turbulence algorithm, but treats the use of perlin noise differently. Features a scale parameter, which changes the noise scale, and a morph parameter, which sets how the noise will change over time.
Flyby
The most basic algorithm, and the default set algorithm; Just moves particles from one end of the simulation to another, without changing in direction. Features a density & difference parameter, which change the density of the particle’s spawning, and the range of the movement speed, respectively.
Spiral
Very similar to flyby, but changes how the particles spawn. In Spiral, the particles will spawn in a circular fashion and move from one end of the simulation to the other without changing in direction. You can set the direction & radius of the spiral spawning in its parameters.
Turbulence
A smooth randomness function, in all directions. Particles in this simulation will loop and shake in every direction as they move. You can set the noise scale, the shift (how the noise will change over time), and the spacing (i.e the spawning randomness) with this algorithm’s parameters.
Undulate
Similar to the cross algorithm, this one moves them more smoothly. The parameters are basically identical to Cross; a rate parameter, which controls the rate at which they move, a shift parameter, which sets how the rate will change over time, and a size, which sets the radius where the particles will originally spawn.
Vortex
This algorithm spins particles around the listener. You can set the direction of the spin, as well as a pull & push parameter, which will set the inward and outward force of the spinning motion (so that particles don’t get thrown out of the boundaries before you’d want them to).
Wormhole
This algorithm functions like a wormhole, when particles spawn they immediately get sucked into the center, and when they approach the end they get thrown back out. You can adjust the size of the wormhole, and in / out falloff of the wormhole, and the drift (how randomly the particles will spawn in relation to their original positions).
Cross Fade
Frahm allows you to run two of the vector field algorithms at once, and fade between them using the slider in the center. Any sort of special spawning function that one of the algorithms may introduce is also cross-faded with the other.
Other
This section covers the four knobs below the Algorithm switch + parameter sliders + crossfade slider section. These are related to the algorithms & control both of them at once.
Density
The “Density” slider controls how long a particle might wait before it spawns again (if the maximum is not reached). At 0% it will wait awhile, at 100% it will not wait very long. The time that a particle will wait is selected randomly, but it strays in a certain range based on the position of the density slider. For instance, if it was at 0% it can wait up to 10 seconds, but it may also wait as little as 6 seconds.
Size
The “Size” slider controls the size of the simulation, in meters. This only changes the doppler shift depth & the distance attenuation that you hear when the particles are spatialized.
Speed
The “Speed” slider sets the speed & direction that particles are moving along an axis. Positive values move the particles positively along an axis, and vice versa. Keep in mind that this only works as another sort of parameter, and some algorithms may treat this value differently than others (all of them will move in a direction of course, but some may not be as fast, etc).
Max
The “Max” slider sets the limit of how many particles can be running at once, with a maximum of 30.
Basis
There is one more vector field related control that is present in the middle “row” of dropdowns + buttons, and this is referred to as the “basis” basis. The basis switch changes the axis that the particles move along. By default it is set to X, which is forward & backward. Y is up & down, and Z is left & right.
User Algorithms
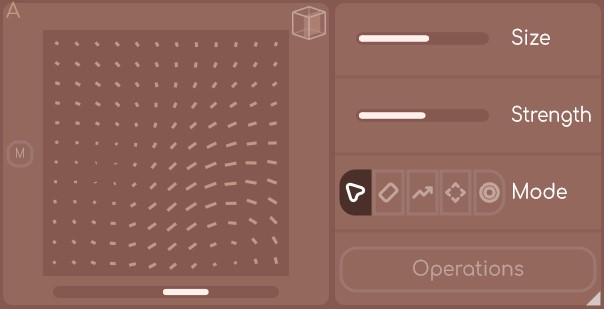
As of Frahm 1.1.0, we have introduced a new feature for creating custom user algorithms via the “User” algorithm. Select the last option in either of the Algorithm dropdown menus, and then click the button that pops up in-place of where the usual algorithm icon is. Doing this opens up the algorithm editor panel;
Algorithm Editor Controls
Size
The size control on the right changes the size of the drawing cursor.
Strength
The strength control changes how much of a change happens when drawing.
Modes
The third control changes the drawing mode;
- The first is “drag” mode, which adjusts the directional force of the field based on the mouse dragging direction.
- The second “erase” mode reduces the directional force.
- The third “multiply” mode multiplies the directional force.
- The fourth “repel” mode moves the directional force away from wherever the mouse is being dragged.
- The final “attract” mode directs the directional force towards the dragged mouse position.
Operations
The “operations” dropdown opens up a series of functions that apply to the entire force field, there are controls to invert & normalize the force field, as well as copy the force field settings from the opposite algorithm, as well as copy from the two algorithms faded together.
Drawing Panel
The drawing panel allows you to “draw” force directions with your mouse. The slider under the editor square changes the Z drawing position. The “M” button on the side swaps between a 2D and 3D view of the system, and does not affect anything else. Holding down shift while drawing will affect every coordinate on the Z axis, rather than just the local area when not holding it down.
Other Controls
The “Doppler” toggle button controls whether or not doppler shift is enabled for the particles. If enabled, then you can also adjust the “doppler factor” which is directly under the Doppler switch. This just changes how long the propagation delay is, which causes a deeper shift as the particles move past the listener.
The spatial quality of the processing is decided with the Spatial Quality dropdown, located in the second row of the main control panel. In stereo mode, the audio is processed according to the left / right / mid channel position of each reflection and outputted accordingly (basic spatialization). The Binaural & HQ Binaural options make use of HRTF filtering for realistic spatial audio perception, but the effect only really works for headphone users.
The Length slider controls the length of the system’s internal audio buffer. It is designed to work as smoothly as possible, so feel free to adjust it in real-time without much trouble. You can also “freeze” the audio (like you can in a delay effect) with the snowflake button to the right of the length slider.
“Tightness” controls how closely the audio is sent to a particle from real-time. For instance, at 100% the sound should mostly all read at the same time, but at 0% a spawned particle will pick a read time randomly from the start to the end of the internal audio buffer. You probably shouldn’t change the length while the freeze button is active (you can’t in the editor, but doing it directly in your DAW might make things weird).
The mix control controls the dry/wet mix of the effect.
Extra Information
Tips
Frahm processes distance attenuation as well as (optionally) doppler shift on its particles. If you don’t want too much distance attenuation but a lot of doppler shift, you can turn the Size knob down and turn the Doppler Factor knob way up. We did a lot of this in the demo sounds found on the website.
Frahm sounds good when layered! Putting an instance of Frahm on multiple tracks in your DAW, and feeding in an “element” of ambience onto each track will let you make something entirely new when you play around with the vector field settings.